My favourite wildlife images are the ones that make me feel like I’m peering through a window, observing nature in a way that I shouldn’t be. They immerse me in the world of that animal and kick my imagination into overdrive. One technique I love to use for this is to add natural frames into my images, by which I mean including elements of the surrounding environment into the foreground of my shot.
Natural frames can add depth, context and interest to your wildlife photography. They’re also useful for situations where getting closer to the animal isn’t possible, or if you are just starting out and don’t have a long, expensive lens yet. Here are 5 quick tips to help you find your natural frame:
#1) FIND A FOREGROUND AND GET CLOSE TO IT
Once you’ve found your subject it’s time to find your frame. Jungles are notoriously difficult for getting clear views of wildlife, and for that reason they’re one of my favourite places to use this technique.
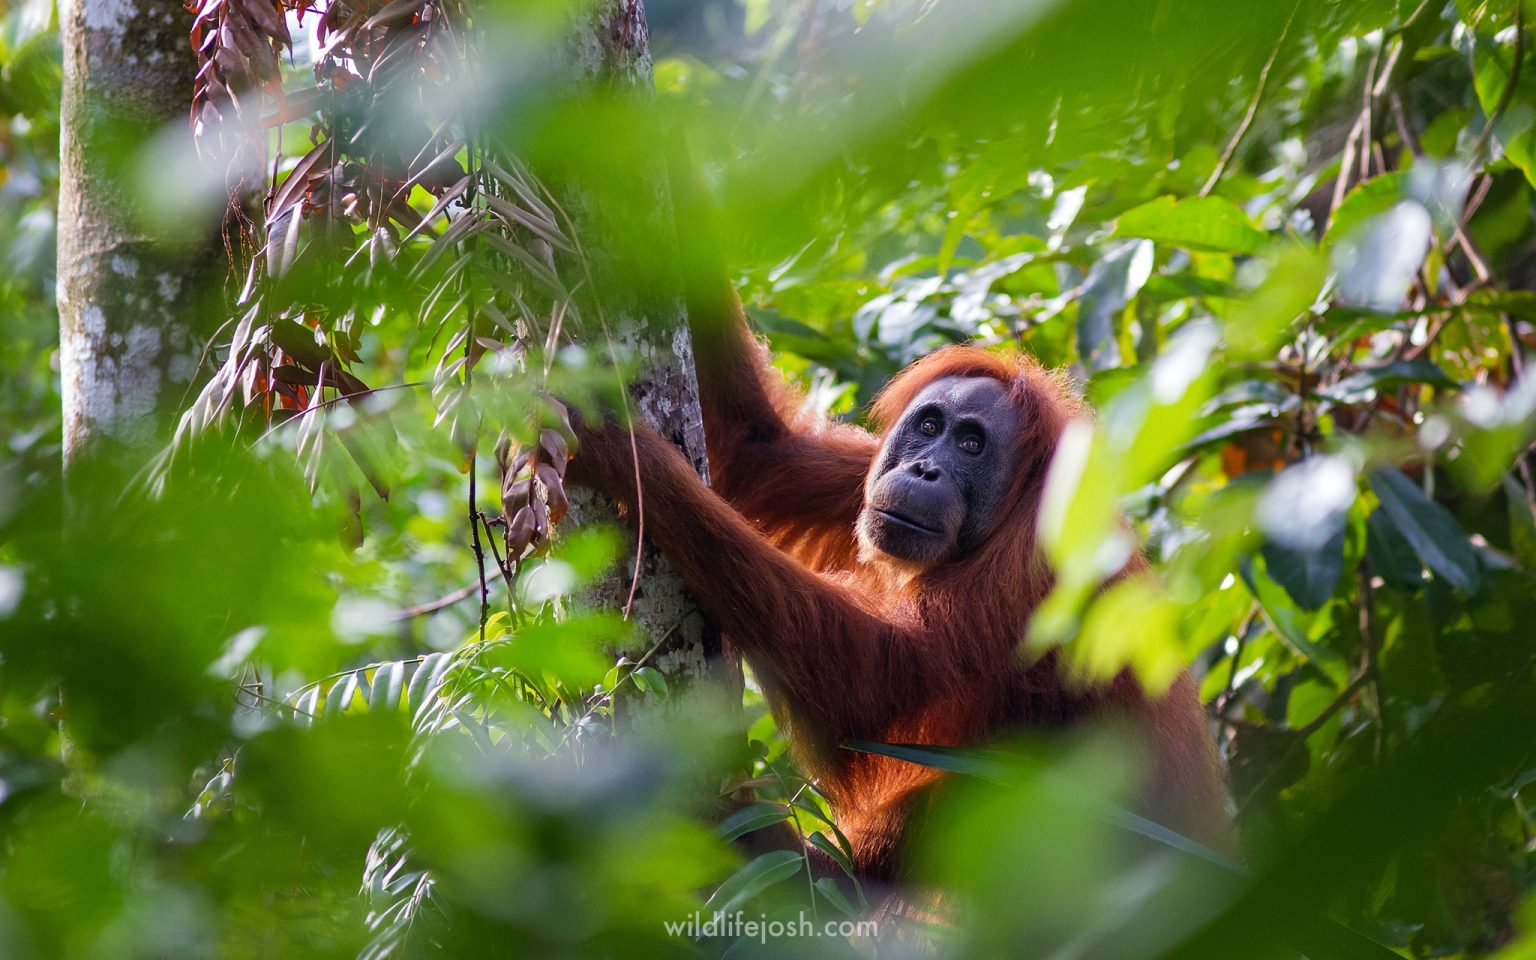
For the Orangutan shot above I found a small gap in the foliage, then moved my lens as close to the leaves as I could (without falling down a steep, muddy slope). The frame that the leaves create around the Orangutan really gives the sense that you’re peering through thick jungle – which is exactly what the experience was like in real life. Getting closer to your foreground interest increases the sense of depth as it will be more out of focus in comparison to the subject.
#2) USE A WIDE APERTURE (BUT NOT TOO WIDE)

As I mentioned above, an out-of-focus frame in the foreground gives your image depth. As well as moving physically closer to your foreground, you will also need to use a wider aperture (lower f-stop) to achieve this. Each situation is different, so experiment with different aperture values for the perfect result.
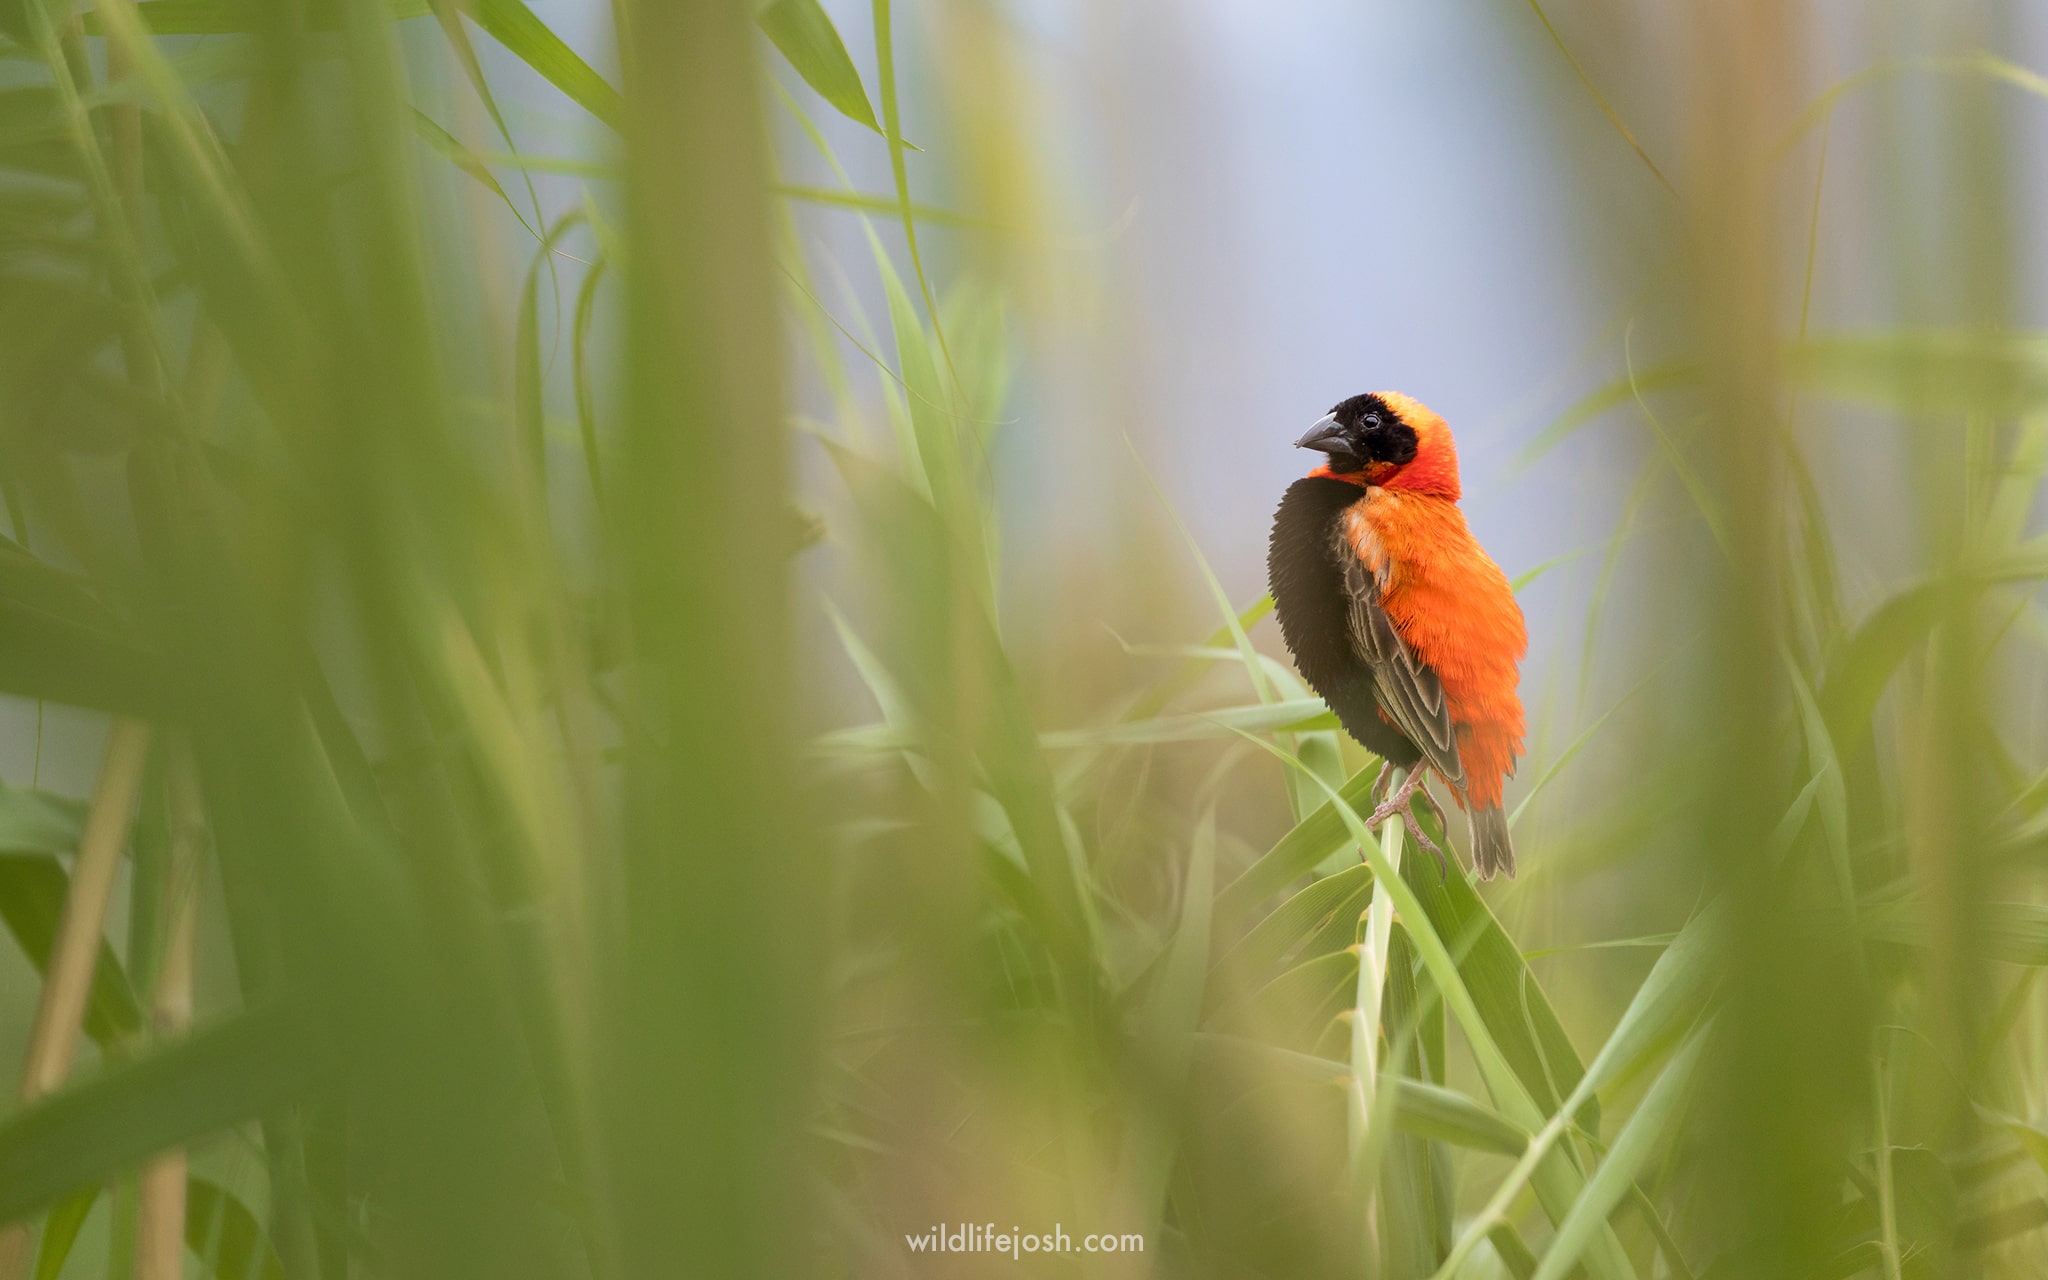
Shooting wide open isn’t always the answer though. If you blur the foreground out too much then you risk losing too much detail. In the shot of the Southern Red Bishop above, I used an aperture of f5.6. Anything lower than that and the Bulrushes in the foreground would have turned into an unrecognisable green smudge.
#3) MOVE YOURSELF
It’s easy to anchor yourself to the ground when you’re photographing, but try to move around with your feet to find the perfect frame. Now that you have something in the foreground of your image, slight movements left and right will make a huge difference to the composition.
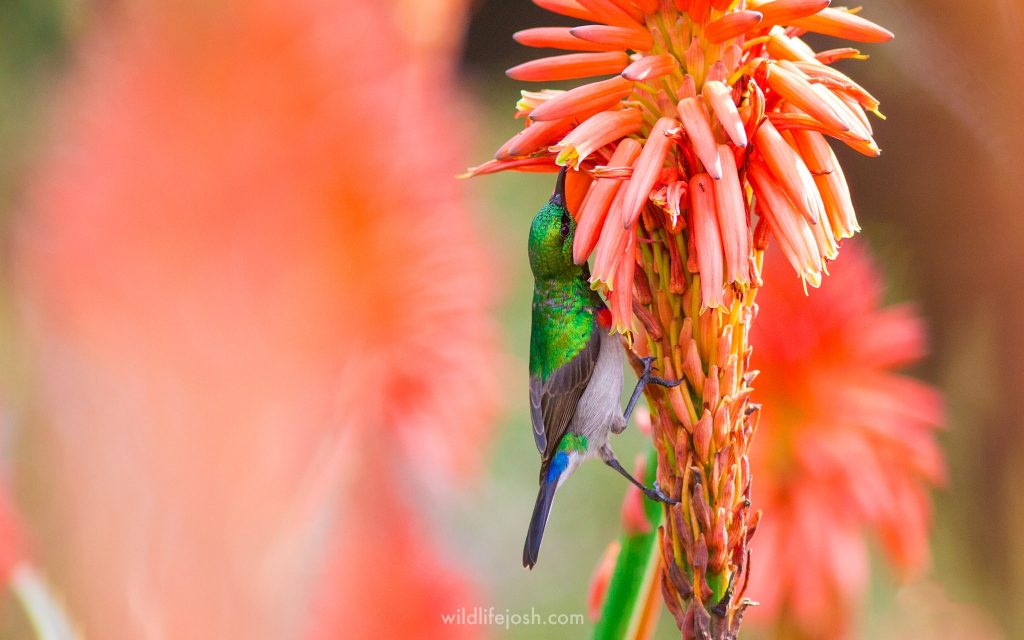
The Southern Double-Collared Sunbird shot above is a great example. If I had moved slightly to my left, the Aloe in the foreground would have completely blocked the bird. If I had moved slightly to my right, the Aloe would have left the frame completely. It took a few seconds of swaying side to side like a stick insect before I found the right composition.
It’s also worth mentioning that your “frame” doesn’t always have to completely surround the animal. Here I used the Aloe in the foreground to simply balance out the composition, whilst still giving that lovely depth effect.
#4) EXPERIMENT WITH COLOURS
Once you’ve got the hang of finding these natural frames, try paying attention to the colours in the image. This can be a great opportunity to add vibrance and contrast.
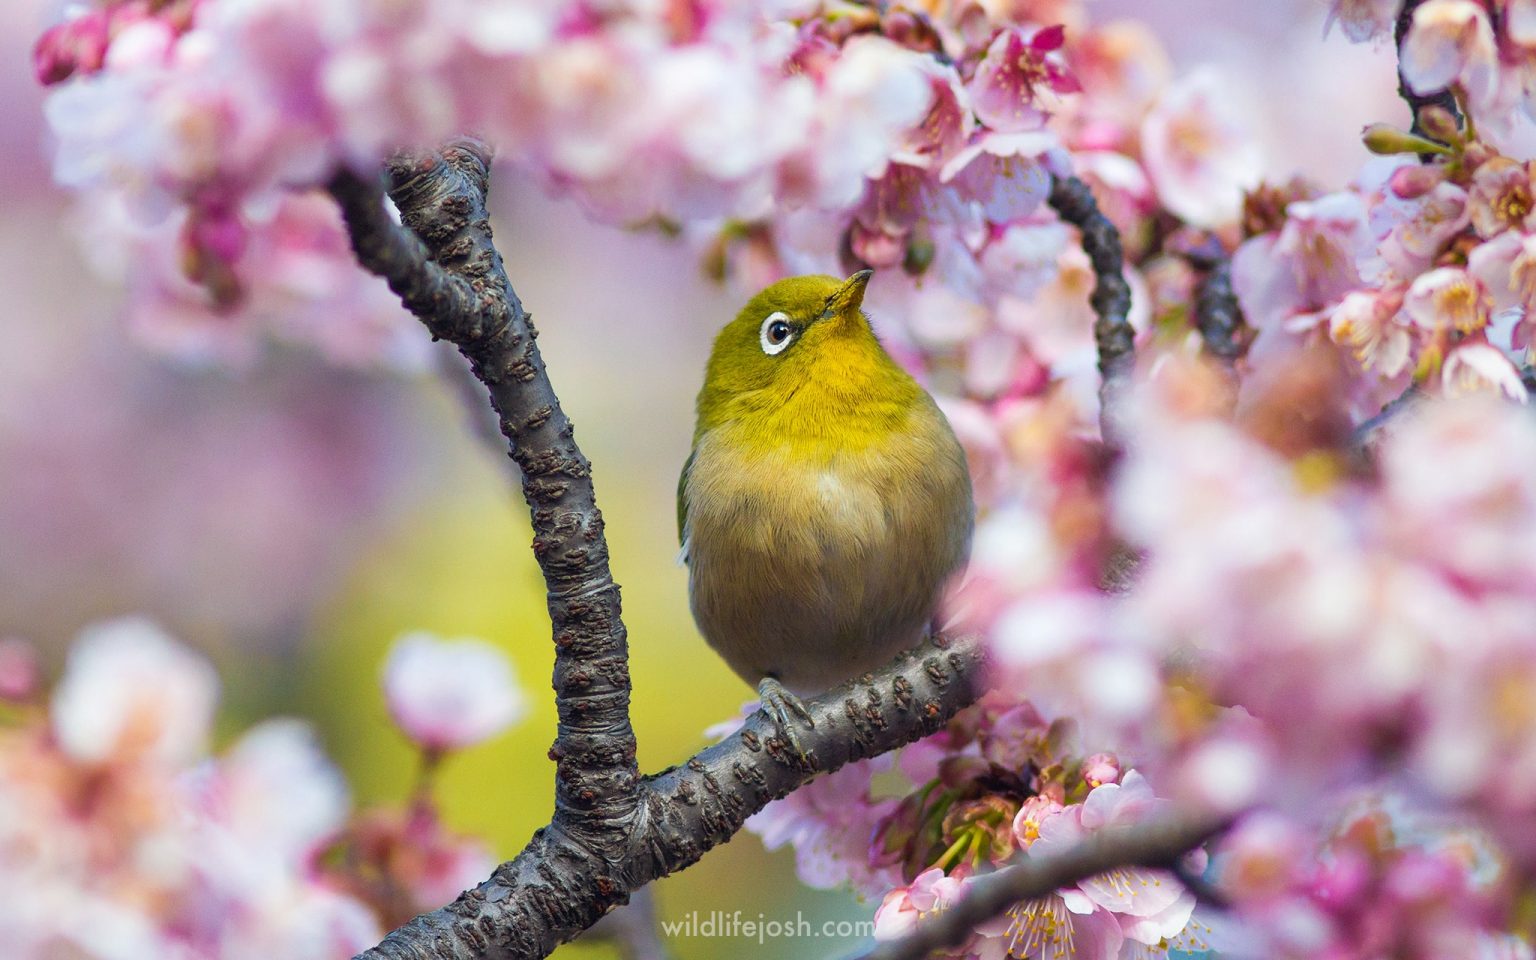
I was following these Japanese White-Eyes around a park in Tokyo. I got some okay shots at first, but it wasn’t until they flew into this blossoming plum tree that my images came to life. The green birds were lost amongst the green trees and bushes, but here they stood out against the bright pink blossom. The Southern Red Bishop shot from earlier also uses colour but in a different way. As the bird is the most colourful part of the image, your eye is naturally drawn to it.
If you’re adding extra elements to your composition, make the most of the opportunity!
#5) TELL A STORY
Naturally framing your subject is also a great opportunity to reveal more of that animal’s story. Where does it live? How does it behave?
Southern Red Bishops depend on Bulrushes for survival. Their position above water instead of land means that both the birds and their nests are safe from predators. The Sumatran Orangutan shot captures the feeling of spotting your first wild Orangutan through dense jungle. Aloes are an important food source for Southern Double-Collared Sunbirds. You get the idea: these compositions carry much more visual information than a straightforward headshot.
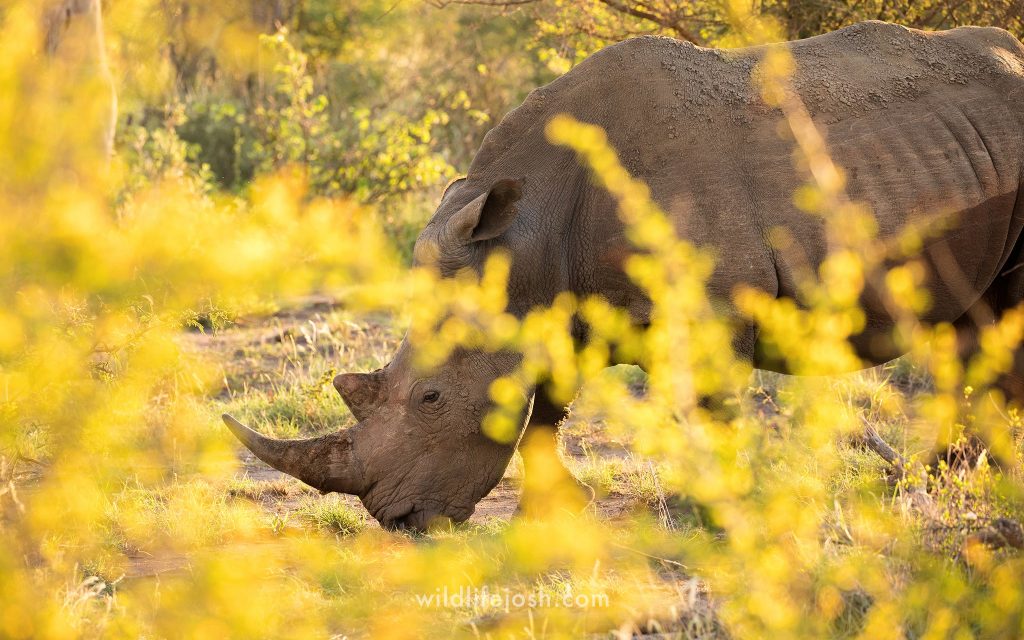
The White Rhino above is a little different, as I have deliberately only framed its head and horn. It’s impossible to look at a rhino in this day and age and not think about the price it carries – in fact, that horn is now worth more than double its weight in gold. For this reason it felt fitting to frame it in golden light, using these shrubs which were beautifully lit by the setting sun.
WRAPPING UP
I hope that this article inspires you to think differently about how you approach wildlife photography. Close-up portraits of animals are great – I take plenty of those as well – but they’re not the only option! Get out there and start incorporating natural elements into your shots and see what happens.
As always, if you do try these tips out then I’d love to know how you get on. Tag me @wildlifejosh on Instagram so I can see them!